How to Make a Sourdough Starter: A Beginner's Guide
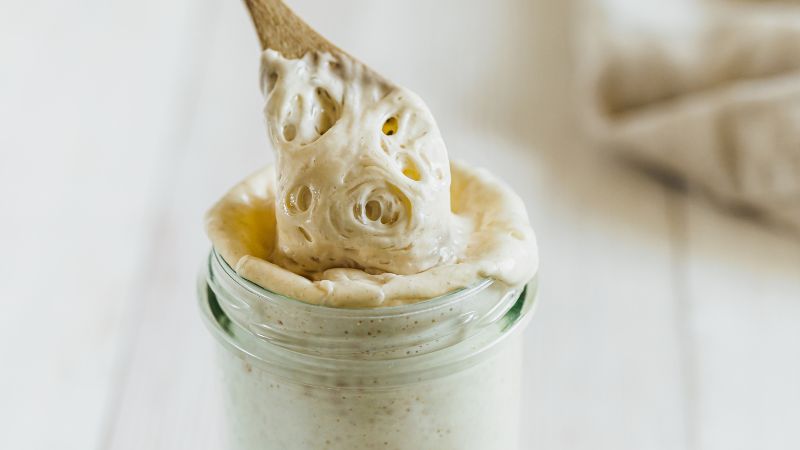

Creating a sourdough starter from scratch is a rewarding endeavor that connects you to the age-old tradition of natural bread-making.
This living culture of wild yeast and beneficial bacteria not only serves as a natural leavening agent but also imparts a distinctive tangy flavor and complex aroma to your baked goods.
For beginners, embarking on this journey may seem daunting, but with patience and consistency, you can cultivate a vibrant starter that will become the cornerstone of your sourdough baking adventures.
In this guide, we will walk you through the step-by-step process of making your own sourdough starter, providing recipes to ensure your success.
What Makes a Starter?
A sourdough starter is a mixture made of fresh flour and water that captures wild yeast and bacteria from the environment. These microorganisms ferment the flour to create the sourdough starter.
The flour provides the necessary sugars and starches that the wild yeast and bacteria feed on. Over time, these microorganisms multiply and create a living culture that bubbles and rises.
Role of Bacteria and Yeast
Wild yeast and bacteria play vital roles in your sourdough starter. Wild yeast, naturally present in the air and flour, is different from commercial baker’s yeast. It creates carbon dioxide during fermentation, which makes your dough rise.
The bacteria, primarily Lactobacillus, produce lactic acid and a little acetic acid, giving sourdough its distinctive tangy taste. The presence of these acids also helps to preserve the bread and improves its texture and flavor.
How Should I Do Before Create My Starter?

To create a sourdough starter, you'll need to choose the right flour and learn how to mix it with water.
How to Choose the Flour
For beginners, a good starting point is often using 100% all-purpose flour, a 50/50 blend of all-purpose and whole wheat flour, or a 50/50 blend of all-purpose and rye flour.
Common Flour Types for Sourdough Starters
- Rye Flour: Rye flour is often recommended for sourdough starters due to its high nutrient and amylase content, which promotes faster maturity and vigorous activity in the starter. It is considered a "superfood" for starters and can help revive a sluggish one.
- Whole Wheat Flour: This flour is nutrient-rich and can foster a robust starter. It contributes interesting flavors and aromas to the bread, although it may ferment more slowly and inhibit gluten development compared to other flours.
- All-Purpose Flour: All-purpose flour is versatile and widely available, making it a popular choice for maintaining a sourdough starter. It provides a good balance of softness and structure and is often recommended for its affordability and ease of use.
For beginners, a good starting point is often using 100% all-purpose flour, a 50/50 blend of all-purpose and whole wheat flour, or a 50/50 blend of all-purpose and rye flour.
Necessities to Prepare When Start Creating
- Clear glass jar (1 quart or 1 liter)
- Digital kitchen scale
- Whole wheat or rye flour
- All-purpose flour
- Filtered or spring water
- Silicone spatula or wooden spoon
- Loose-fitting lid or cloth cover
How to Create the Starter? Step By Step Guide

Day 1: Initiation
- In the glass container, combine 100g of whole wheat or rye flour with 100g of room temperature water (approximately 21°C).
- Mix thoroughly until fully incorporated, ensuring no dry flour remains.
- Cover the container with a breathable material and store it at ambient temperature (21-24°C) for 24 hours.
Day 2: Observation
- Examine the mixture for signs of microbial activity, typically manifested as small bubbles.
- If no activity is observed, allow the mixture to ferment for an additional 24 hours.
Day 3: First Feeding Your Starter
- Discard half (100g) of the fermented mixture, discarding the remainder.
- To the retained 100g, add 100g of all-purpose flour and 100g of water.
- Mix thoroughly, cover, and allow to ferment for 24 hours at ambient temperature.
Days 4-6: Feeding Cycle
Repeat the following process daily:
- Discard all but 100g of the fermented mixture.
- Add 100g of all-purpose flour and 100g of water to the retained portion.
- Mix thoroughly, cover, and ferment for 24 hours at ambient temperature.
During this period, increased microbial activity was observed, manifested as a greater number of bubbles and a gradual increase in volume post-feeding.
Day 7: Maturity Assessment
- Conduct the daily feeding as described above.
- Monitor the mixture for signs of maturity:
- Doubling in volume within 4-6 hours post-feeding
- Development of a complex, acidic aroma
- The presence of numerous bubbles throughout the mixture
- To confirm readiness, perform a float test: place a small amount of the starter in water. If it floats, the starter has likely reached sufficient maturity for baking applications.
Troubleshooting Common Issues
Sometimes, your starter might face issues like mold or hooch. Here’s how to handle them:
- Hooch: This is a layer of liquid that appears on top. Stir it back in or pour it off before feeding.
- Mold: If you see mold, discard the starter and begin anew. Mold spoils the batch and isn’t safe.
- Not Bubbling: If your starter isn’t bubbly, it might need more frequent feedings or a warmer spot.
- Smells: A sour smell is normal, but if it smells alcohol-like, it might need feeding more often.
How to Storing My Sourdough Starter?

Room temperature storage is ideal for those who bake regularly and require an active starter on short notice.
Your starter should be kept at room temperature (approximately 21-24°C or 70-75°F), and it is necessary to feed twice daily. This helps the active fermentation process, ensuring the starter remains vigorous and ready for use.
For those who bake less frequently, refrigeration offers a practical solution to reduce feeding frequency while maintaining starter viability.
Your refrigerated starter requires feeding approximately once a week. Before refrigerating, feed the starter and allow it to ferment at room temperature for 2-3 hours to ensure it is active.
Store the starter in a container with a secure, but not airtight, lid to prevent contamination while allowing gases to escape. This prevents pressure buildup and potential container damage.
When you start baking, remove the starter from the refrigerator and allow it to come to room temperature. Feed it 1-2 times to reactivate the fermentation process and restore its leavening power.
How to Baking Sourdough: Make Sourdough Pizza

Indigrants
- Cup of flour ( 288g Type 00 white flour or all-purpose flour)
- 32g whole wheat flour
- 215g water
- 2g diastatic malt (optional)
- 6g salt
- 48g ripe sourdough starter
Instructions:
In a large mixing bowl, combine the water, ripe sourdough starter, flour, salt, and malt. Mix by hand until all ingredients are fully incorporated.
Once mixed, knead the dough on a lightly floured surface until it becomes smooth and elastic. This process helps develop the gluten structure necessary for a good pizza crust.
Place the dough back into the bowl, cover it, and let it rise at room temperature for several hours until it doubles in size. This fermentation period allows the natural yeasts and bacteria in the sourdough starter to leaven the dough.
Once the dough has risen, divide it into desired portions (e.g., for individual pizzas) and shape each portion into a ball. Let the dough rest for a short period to relax the gluten, making it easier to stretch.
Allow the shaped dough balls to proof at room temperature for about 30 minutes to an hour, or refrigerate them for a longer, slower fermentation, which can enhance flavor.
Preheat your oven to a high temperature (around 240°C/220°C fan/gas 8) with a baking stone or steel inside to simulate a pizza oven environment.
Beginner Sourdough Starter Recipe: Make Sourdough Bread

In addition to making pizza, sourdough can also be used to make bread. Here is the sourdough bread recipe.
Ingredients
- Levain:
- 38 grams of ground whole wheat flour
- 38 grams of bread flour
- 76 grams water
- 38 grams ripe sourdough starter
- Main Dough:
- 773 grams of bread flour
- 114 grams of whole wheat flour
- 51 grams whole grain rye flour
- 653 grams water
- 18 grams of fine sea salt
Instructions
- Prepare the Levain:
- Mix the levain ingredients in a bowl and cover. Let it sit at room temperature for about 5 hours or until it becomes bubbly and active.
- Mix the Dough:
- In a large bowl, combine the bread flour, whole wheat flour, and rye flour.
- Add the water and mix until no dry flour remains. Let it rest for 30 minutes to 1 hour (autolyse).
- Add Levain and Salt:
- Add the prepared levain and salt to the dough. Mix thoroughly until well incorporated.
- Bulk Fermentation:
- Transfer the dough to a straight-sided vessel. Cover and let it rise at room temperature. Perform a set of stretches and folds every 30 minutes for the first 2 hours. Continue to let the dough rise until it increases in volume by 50%.
- Shape the Dough:
- Turn the dough out onto a lightly floured surface. Shape it gently into a round and let it rest for 20-40 minutes (bench rest).
- Final Proofing:
- Shape the dough again and place it into a prepared bowl or banneton lined with a floured cloth. Cover and refrigerate for 12 to 48 hours for the final proof.
- Bake:
- Preheat your oven to 450°F (232°C) with a Dutch oven inside. Once preheated, carefully transfer the dough to the Dutch oven, score the top, and cover with the lid.
- Bake covered for 20 minutes, then remove the lid and bake for an additional 25-30 minutes or until the crust is deep golden brown.
What are the Creative Uses of Discard Sourdough?

Here are some creative sourdough discard recipes you can use it to make different dishes for your family:
Sweet Sourdough Discard Recipes
- Sourdough Pancakes:
- Use the discard to add a tangy flavor and extra fluffiness to the pancake batter. Combine with flour, sugar, milk, and eggs, then cook on a hot skillet for a delicious breakfast treat.
- Sourdough Banana Bread Recipes:
- Incorporate sourdough discard into banana bread for added moisture and a subtle tang. This recipe is perfect for using up overripe bananas and can be customized with nuts or chocolate chips.
- Sourdough Cakes:
- Create soft, moist cakes by adding sourdough discard to your batter. Try recipes like chocolate cake, banana crumb cake, or carrot cake for a unique twist on classic desserts.
Savory Sourdough Discard Recipes
- Sourdough Crackers:
- Mix sourdough discard with seeds, herbs, and flour to create a dough. Roll it out thinly, cut into shapes, and bake until crispy for a savory snack.
- Sourdough Crumpets:
- Add discard to crumpet batter for a light and airy texture. Cook on a griddle until golden brown for a classic British treat.
- Sourdough English Muffins:
- Use discard in English muffin dough for a tender texture with plenty of nooks and crannies. These muffins require two rises but are worth the effort for their tangy flavor.
- Sourdough Pizza Dough:
- Enhance your pizza dough with sourdough discard for a crispy and chewy crust. Top with your favorite ingredients and bake for a delicious homemade pizza.
Other Sourdough Recipe Ideas
- Sourdough Waffles:
- Similar to pancakes, waffles made with sourdough discard are crispy on the outside and fluffy on the inside. Serve with maple syrup and fresh fruit for a delightful breakfast.
- Sourdough Scones:
- Incorporate discard into scone dough for added flavor and texture. Try both sweet and savory variations, such as classic cheese scones or fruit-filled scones.
- Sourdough Dumplings:
- Drop spoonfuls of sourdough discard into simmering soups or stews to create light and fluffy dumplings that add a tangy note to the dish.
Frequently Asked Questions
What type of flour yields the best results for a robust sourdough starter?
Whole grain flours like whole wheat or rye can give your starter a strong boost. They contain more nutrients than wild yeast and bacteria thrive on. Mixing them with all-purpose flour can also work well.
Is it possible to create a sourdough starter using commercial yeast?
Using commercial yeast isn't recommended when starting a sourdough culture. Sourdough relies on wild yeast and bacteria for its unique flavor and texture. Commercial yeast could disrupt this natural balance.
Why do I need to discard part of the starter?
Discarding part of the starter helps maintain a manageable size and prevents excessive acidity. It also ensures a balanced environment for yeast and bacteria to thrive.
How can I tell when my starter is ready?
Your starter is ready when it consistently doubles in size within 4-12 hours of feeding, produces bubbles, has a pleasant tangy aroma, and passes the float test (a small portion floats in water).
What if my starter is sluggish?
If your starter is not showing signs of activity after a few days, try adding a small amount of flour and water 12 hours after feeding to give it a boost.
How do I maintain my sourdough starter?
For the first two weeks, continue daily feedings to build a robust starter. Afterward, you can adjust the feeding schedule based on your baking frequency, storing it in the refrigerator if needed to slow fermentation.
How can I create a warm spot for my starter?
Place your starter near a warm appliance, use a proofing box, or place a heating pad under the container. Ensure the temperature remains around 75°F (24°C) for optimal fermentation.





 Aluminum Dining Table
 WPC Dining Table
 HDPE Dining Table
 Cart
Cart
 Gas Burner
 Hat
Hat
 Apron
Apron
 Swivel Rocker Set
 Textilene Chairs
 HDPE Chairs
 Wicker Counter Height Barstools
 Metal Counter Height Barstools


